Sunday, July 22, 2012

Welcome to the Family!

I've been slacking on the blog posts, but I came here to announce the newest addition to our family:  The Vitamix 6300!  It's only been a day since the new bundle of joy joined our family, but she's already become part of the daily routine.

To start, a little about the Vitamix 6300:  All Vitamixes are high-powered blenders.  While normal blenders fail at crushing blackberry seeds, grinding ice, or removing celery fibers the Vitamix does it all.  Specifically, the Vitamix 6300 is a Costco exclusive--it's the rebranding of the Pro 500 for Costco with a price savings of $100.

So what have I done with the Vitamix so far?  I was lucky enough to score a GIANT watermelon in my co-op share this week, so I decided I needed to use this asap.  This morning, I enjoyed a whole fruit smoothie including watermelon (seeds and all), cucumber, marionberries, blueberries, and raspberries.  Thirty seconds in the blender and I was left with a smooth, refreshing summer smoothie.

And now, as I type, I'm enjoying a serrano-watermelon daiquiri.  Daiquiri's are normally rum-based, but in this version I'm using my serrano infused vodka.

Recipes:


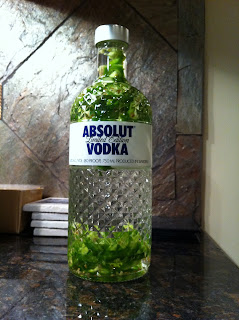
Serrano Infused Vodka (serves a bunch)

Ingredients:

  • 1 bottle of vodka (use any mid-range brand, the serranos are the main event here)
  • A handful of serrano peppers, chopped


  1. Dump chopped peppers into vodka bottle. (Note: You might have to use some of the vodka to make room for the peppers.  Hard work, I know!)
  2. Wait for two weeks to let the peppers infuse the vodka.
  3. After two weeks, use a coffee filter lined strainer to strain all sediment from the vodka.


Serrano-Watermelon Daiquiri (serves 2)

Ingredients (measurements are approximate)
  • 1 cup of watermelon, chopped (seeds are fine)
  • 1 whole lime, peeled
  • 2 tablespoons simple syrup
  • 3 ounces serrano vodka
  • 1.5 cups of ice
  1. Put all the ingredients in the blender and blend until smooth.  


VOILA!  One day in the family, and already earning her keep.  I'm excited to see what else I can whip up with this weeks co-op share:  celery, apples, kale, carrots, cucumbers, tomatoes, cilantro, oranges, okra, and bananas.  


Tuesday, March 27, 2012

Portion sizes and weight loss

Well folks, I seem to have failed at this blog.  I left a job, joined a new company, and just got all tied up in life.

I will say that I haven't stopped thinking about food.  During this whole time, I've been thinking about it constantly.  The idea of eating healthier has been consuming my mind, so "A" and I started in January on a prepared meal plan called My Fit Foods (www.myfitfoods.com).  You can think of it as Nutrisystem, but fresh and healthy.  We both lost a lot of weight (I lost 4% body fat!), but perhaps the biggest thing we gained (pun intended) was a lesson in portion sizes.  No matter how many times I've been told that a serving of meat is 4 oz, or the size of a deck of cards, it never really stuck with me.  I only just now learned this with practice.  Through the meal plan, these ideal portion sizes were reinforced every day.

With this increased interest in portion sizes I decided to buy a food scale.  I can't tell you how much this has helped.  Food labels are confusing, not to mention often inaccurate.  Example:  I was portioning out almond butter earlier, and the label indicated that the serving size was 2 tablespoons or 32 grams.  I set a little container on the food scale, zeroed the scale, and put about 32 grams of almond butter in the container.  Surprisingly, 32 grams = only one full tablespoon!  I felt cheated!  All this time,  I thought I'd been calculating my calories correctly, but a simple slip up like this can add 190 calories to an otherwise innocent snack!  No wonder I've been running into problems. 

So now I've started weighing everything.  The scale can be a little funky as the object's weight approaches zero.  Apparently, a potato chip has zero calories, so go ahead and eat all you want!  :-)

I hope to bring you new recipes soon, and with better calorie information thanks to my new scale.  Stay tuned!


Friday, August 26, 2011

Recipe: Healthy Chicken Parmesan

Everybody loves Italian food, but heavy cheeses, decadent sauces and starchy pastas make it an occasional treat.  Not anymore!  I've lightened up a traditional Chicken Parmesan recipe, added whole grains, and slashed the fat to make this a dinnertime regular. 
Healthy Chicken Parmesan- Serves 4
Ingredients
·        3 boneless, skinless chicken breasts pounded to ½ inch thickness and cut into palm size pieces
·        ½ pound whole wheat spaghetti
·        2 jars of your favorite store bought pasta sauce
·        3 egg whites, beaten
·        1½ cups Baked Lentil Chips
·        ½ cup Grape Nuts cereal
·        1 tsp salt
·        ½ tsp black pepper
·        ½ tsp garlic powder
·        Low fat, shredded mozzarella cheese
·        Shredded parmesan cheese

Directions
1.      Preheat your oven to 400°F.
2.      In your food processer, pulse the lentil chips, cereal, salt, pepper, and garlic powder until all ingredients take on a breadcrumb texture.  Spread the breadcrumbs out in a large, shallow dish.  This will be the breading for the chicken.
3.      In a large, shallow bowl lightly beat the egg whites.  Prepare a cookie sheet by lightly coating it with cooking spray.
4.      Take your chicken pieces and first dunk both sides in the egg whites and then coat each side with the breadcrumb mixture.  Move the coated pieces to your baking sheet.
5.      Lightly spray the tops of all the breaded chicken pieces with additional cooking spray.  Place cookie sheet in preheated oven for 10-15 minutes, or until chicken is fully cooked through.
6.      While chicken is in the oven, set a large pot of water to boil for your pasta.
7.      Prepare a casserole dish by spooning some of the pasta sauce into the bottom of the dish. Use just enough to lightly coat the bottom.  Place cooked chicken pieces on top of the sauce.  Spoon about ¾ cup of the remaining pasta sauce around and on top of the chicken pieces.  Let some of the breaded chicken peek through.   
8.      Sprinkle each chicken piece lightly with a teaspoon of parmesan cheese.  Next, sprinkle each piece with about a tablespoon of mozzarella cheese.  Place the prepared dish in the preheated oven for 20 minutes.
9.      While the chicken is in the oven, cook your pasta according to package instructions.  This is generally about 7 minutes, so time this to coincide with the last seven minutes your chicken is in the oven. 
10.  Gently warm through the rest of your pasta sauce.  If you’re like me, you might want to jazz up the pasta sauce with some garlic and red pepper flakes lightly sautéed in a teaspoon of olive oil.  This step is optional.
11.   Plate and serve your chicken.  Serve with a heap of pasta and sauce on the side.  Round the meal out with a garden salad and a glass of wine.  Enjoy!
My cheese got a little too brown when I got distracted by my puppy, but it still tasted exactly like the original.  Mmmm, fiberlicious!

Welcome!

Hi everybody, and thank you for visiting my blog.  The purpose of this blog is to share tips, food finds, and recipes that I've collected as a frenzied foodie.  So sit down, kick your shoes off, grab a drink (recipes to come!) and enjoy. 

Cheers,
Top Shef